What It Does
This project transformed a traditional marble board game into a deeply personal family experience. Each of the 18 extended family members received their own unique set of four themed marbles, all designed to play together on a custom wooden board.
- 72 total custom game pieces (18 sets of 4)
- Each set features a unique theme: Pac-Man ghosts, teacups, flowers, skeletons, flames, graduation caps, robots, and more
- Every piece 3D-printed, sanded, cleaned, and hand-painted
- Individual gift tins with foam inserts and matching dice
- A handmade laminated wood marble board with felt-lined dice tray
- Designed for multiplayer family game nights where everyone plays with their personalized set
Why I Built This
For Christmas, I wanted to give every member of my extended family the same game, but with a deeply personal twist. Instead of buying off-the-shelf game pieces, I decided to design, print, and paint a unique set of marbles for each person—something that would feel intentionally chosen for them, not random.
The idea was to create a shared tradition around a communal game board, but where each player would have their own memorable, handcrafted pieces. It's a gift that's both individual and collective: everyone gets their own tin of custom marbles, but they all come together on the same board for family game night.
 Design exploration: testing which shapes read well at marble scale and which have recognizable silhouettes from across the table.
How It Works
Early Print Tests – Dialing in the Miniatures
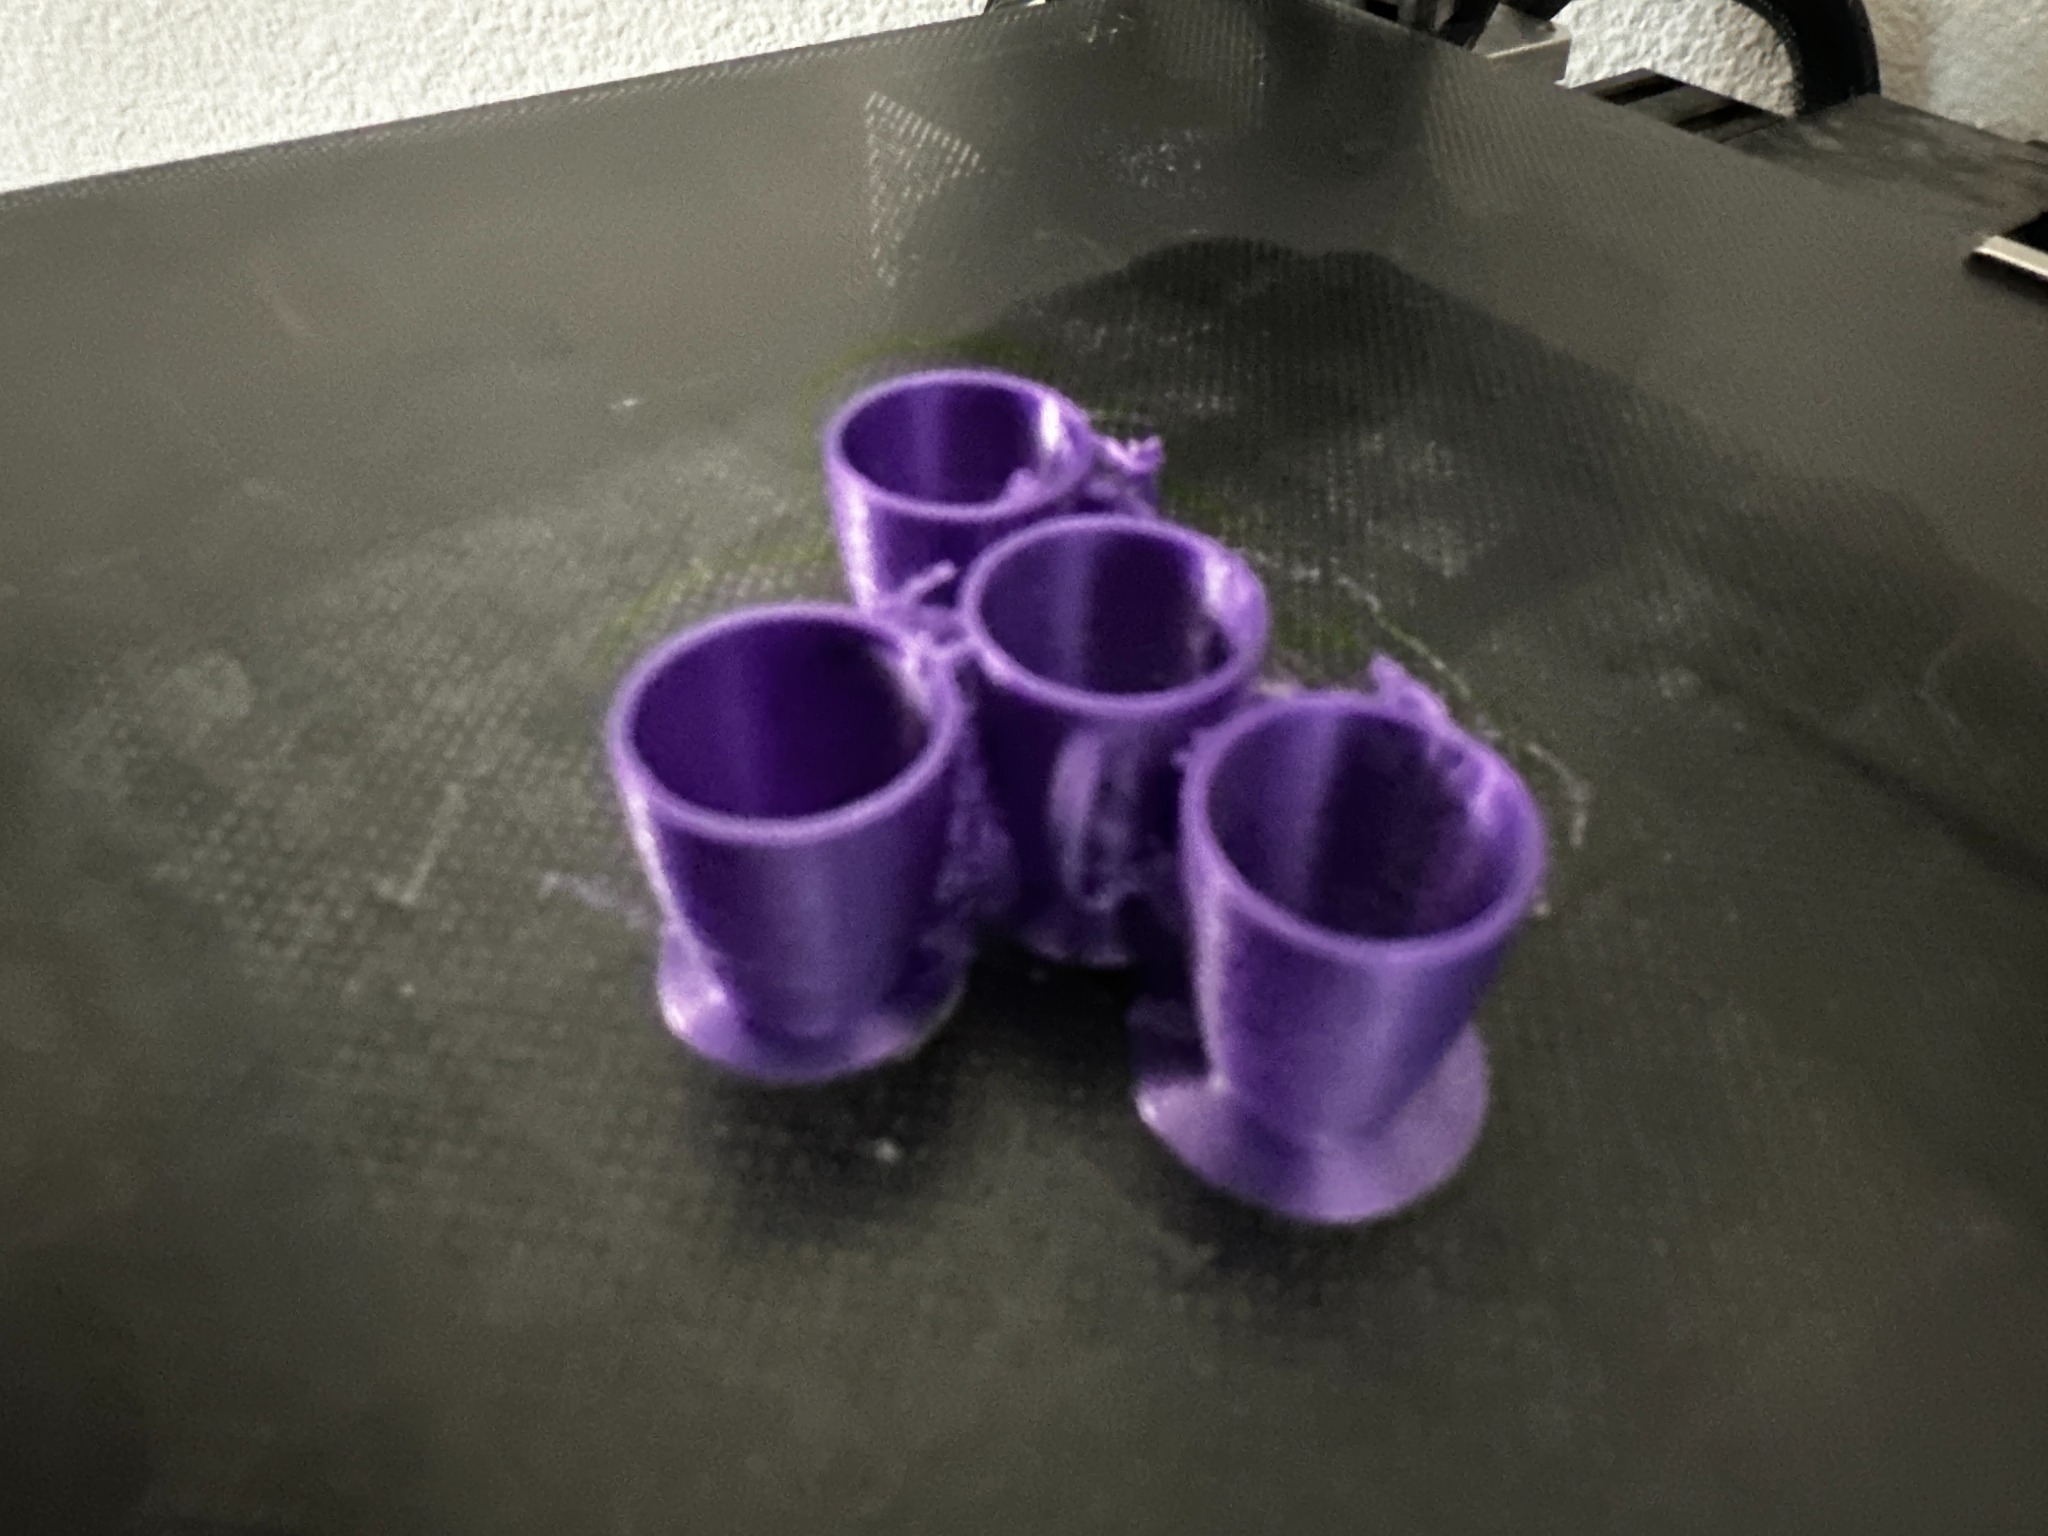
The first step was proving that "marble as a tiny character" would actually work mechanically on a game board. I started with test prints of four tiny cup shapes, experimenting with scale and printability. At this size, wall thickness, overhangs, and supports are critical.
Printing them as a connected group of four let me quickly see how a full set would look and how they'd fit in the board holes later. I was also checking how much post-processing effort each design would require once supports were removed.
 First tangible steps: test printing to validate scale, printability, and support requirements.
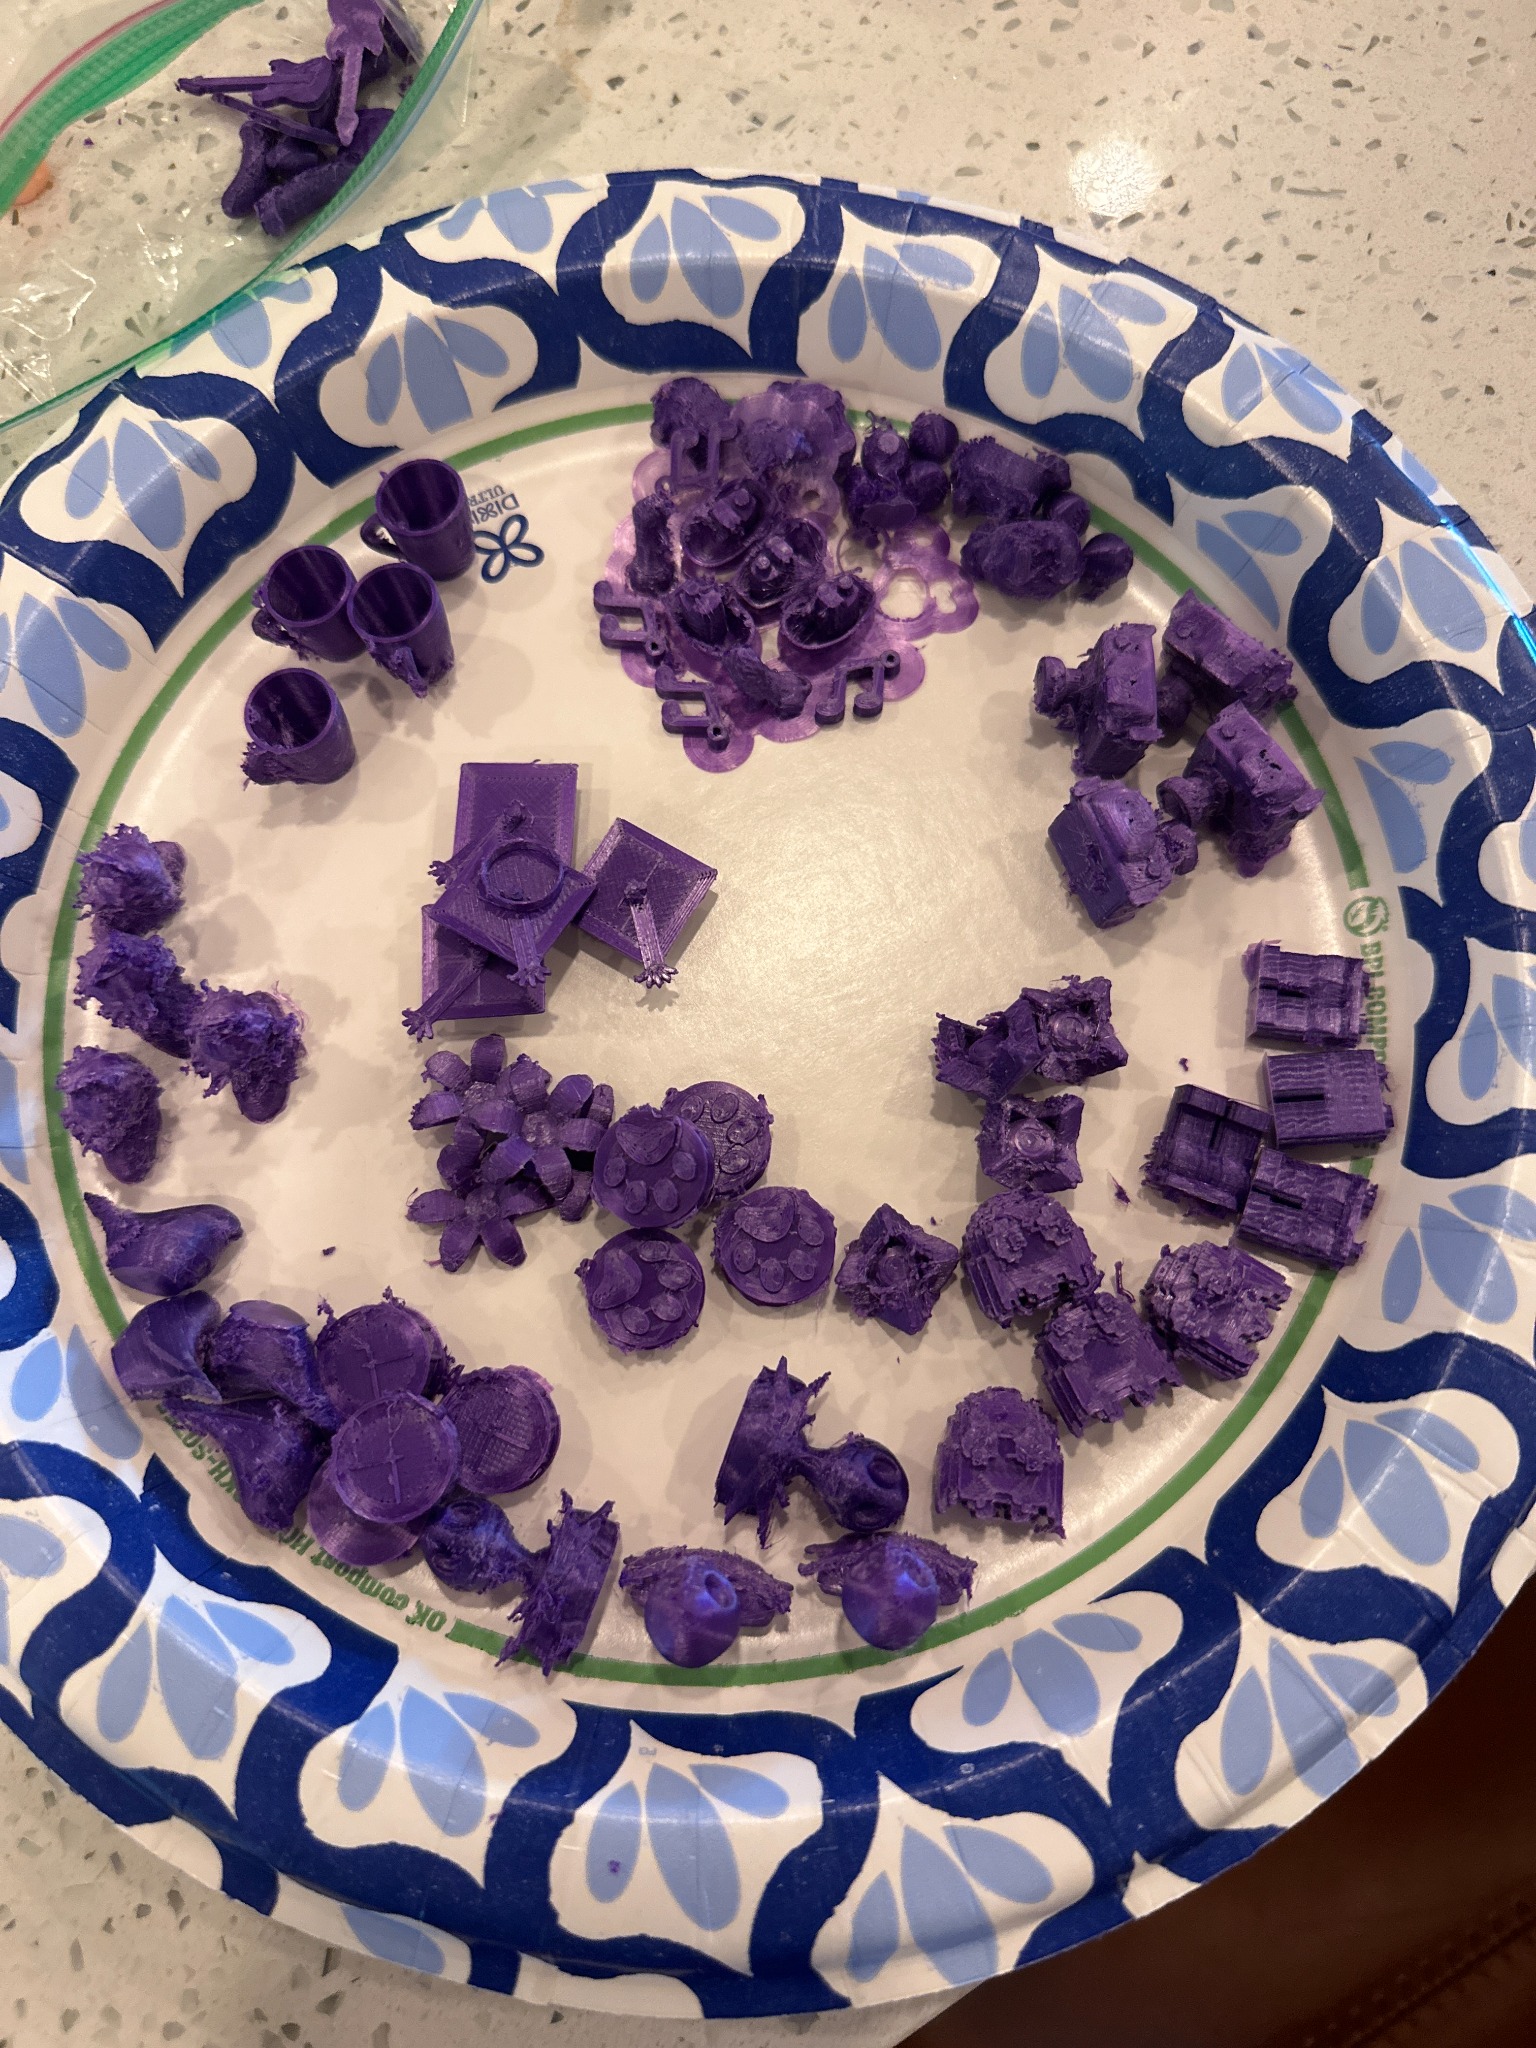
Design Exploration – Choosing the Final Themes
Rather than committing to one design, I went wide: a full paper plate of purple prototype pieces including cups, flowers, ghosts, skulls, houses, and animals. I was printing many different designs at once to see what reads well at marble scale and what just turns into a blob.
This was the audition round for the final 18 themes. I was asking: Which shapes stand up well after supports are removed? Which have silhouettes that are still recognizable from across the table? Which are fun enough that people will want to pick them as "their" marbles?
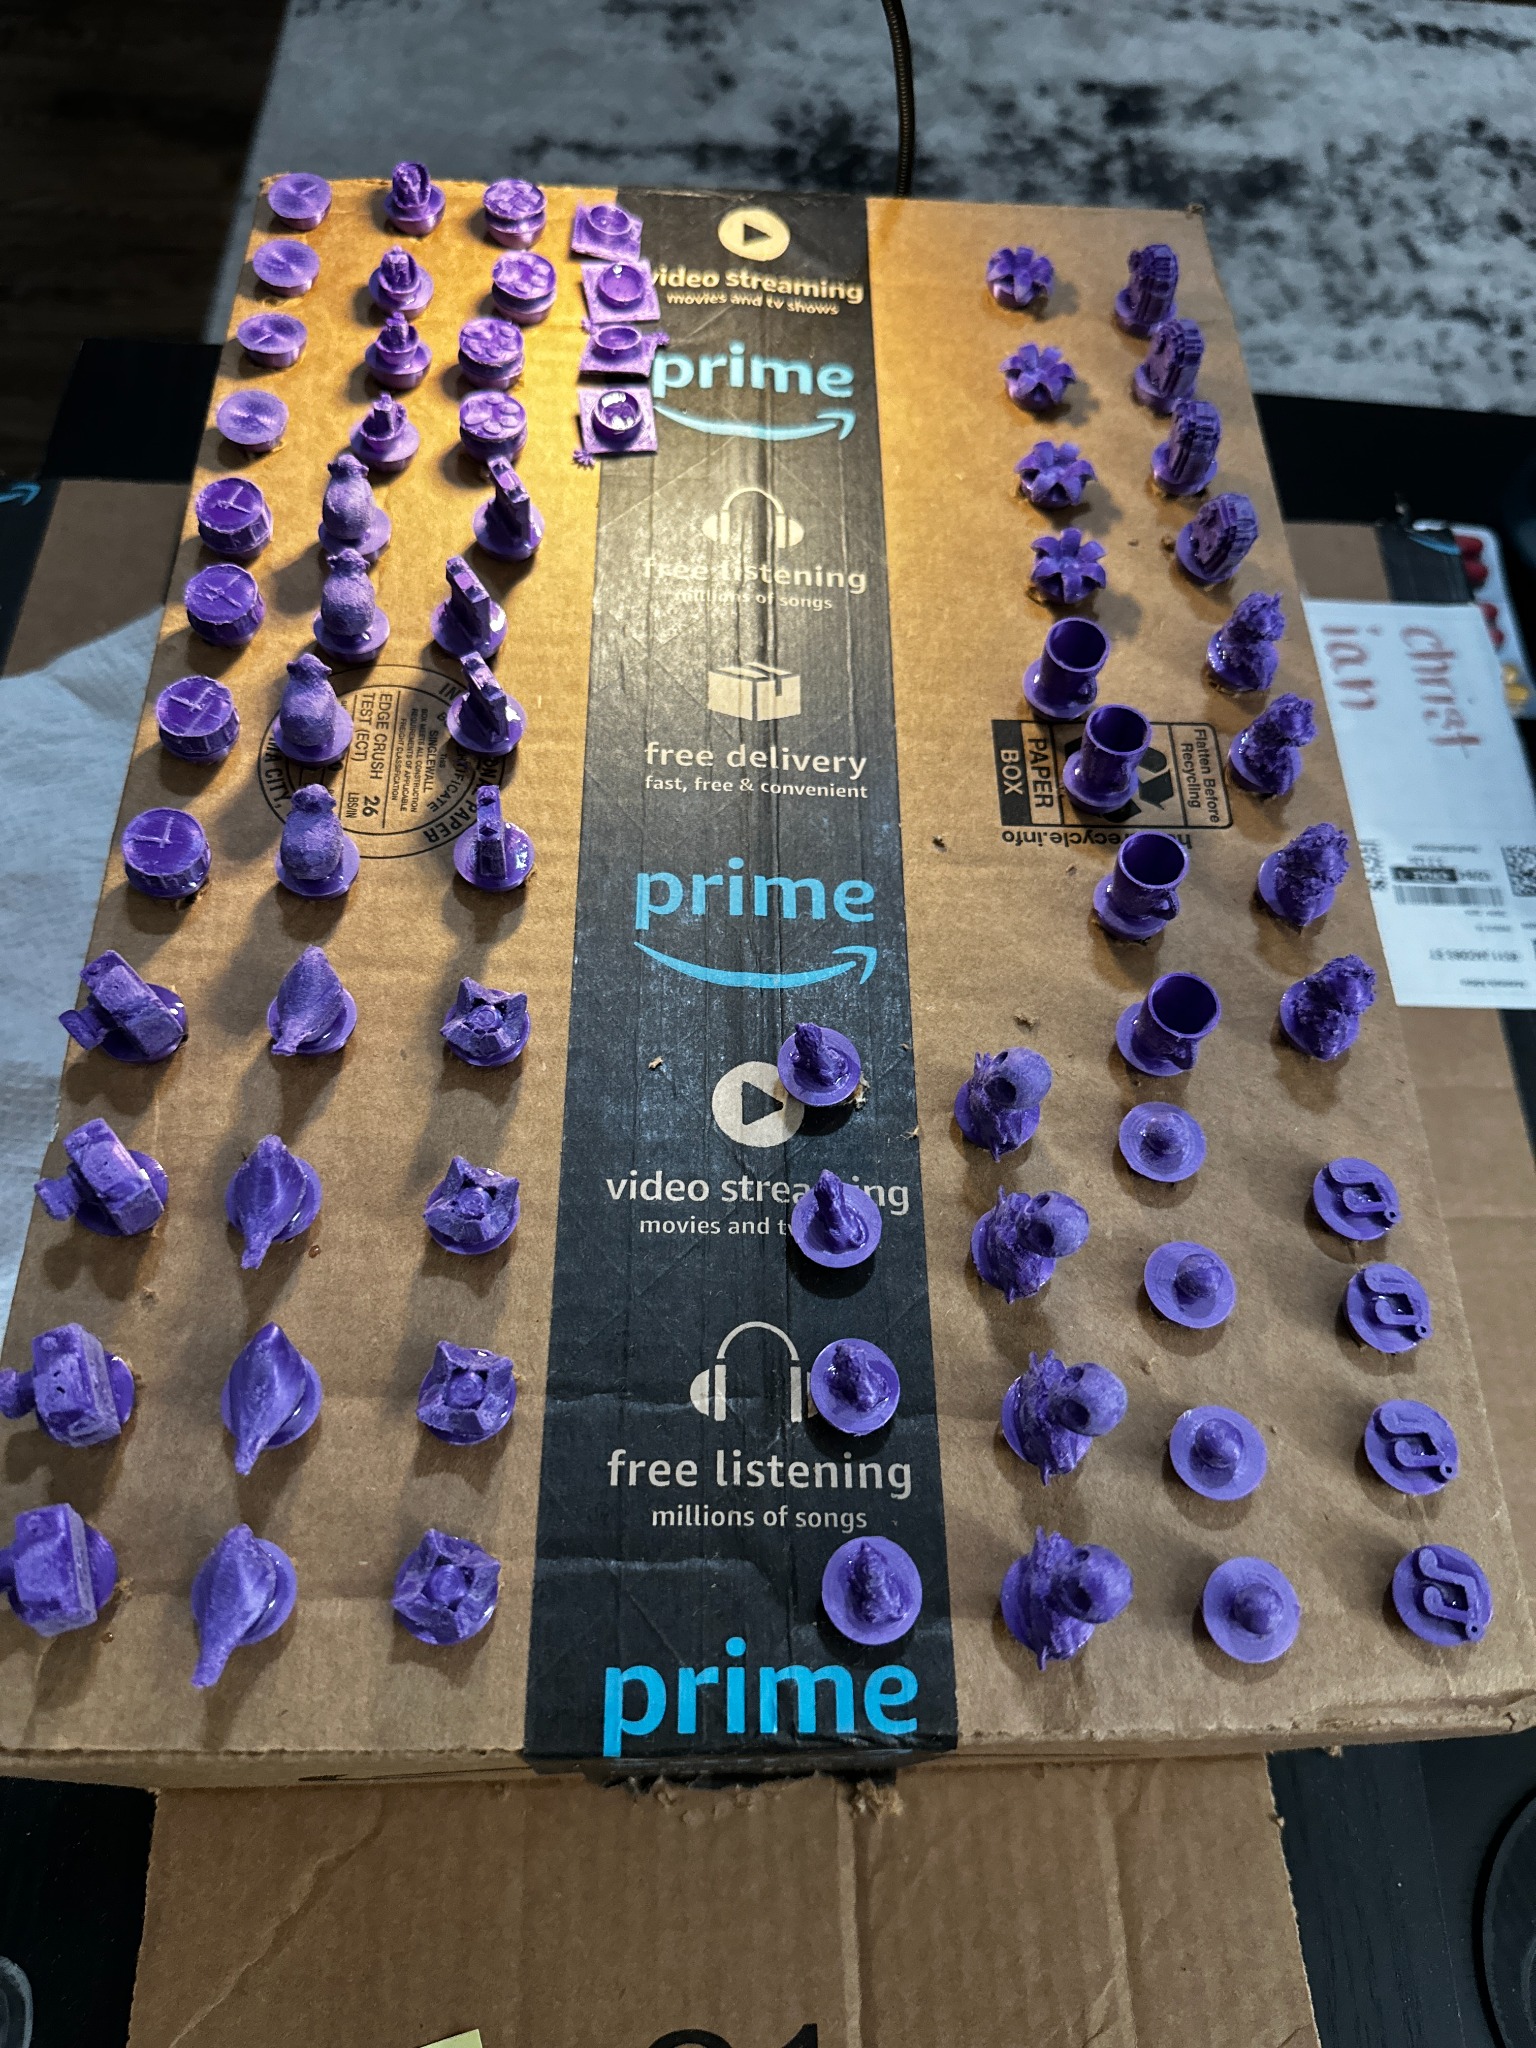
Production Run – 72 Raw Marbles
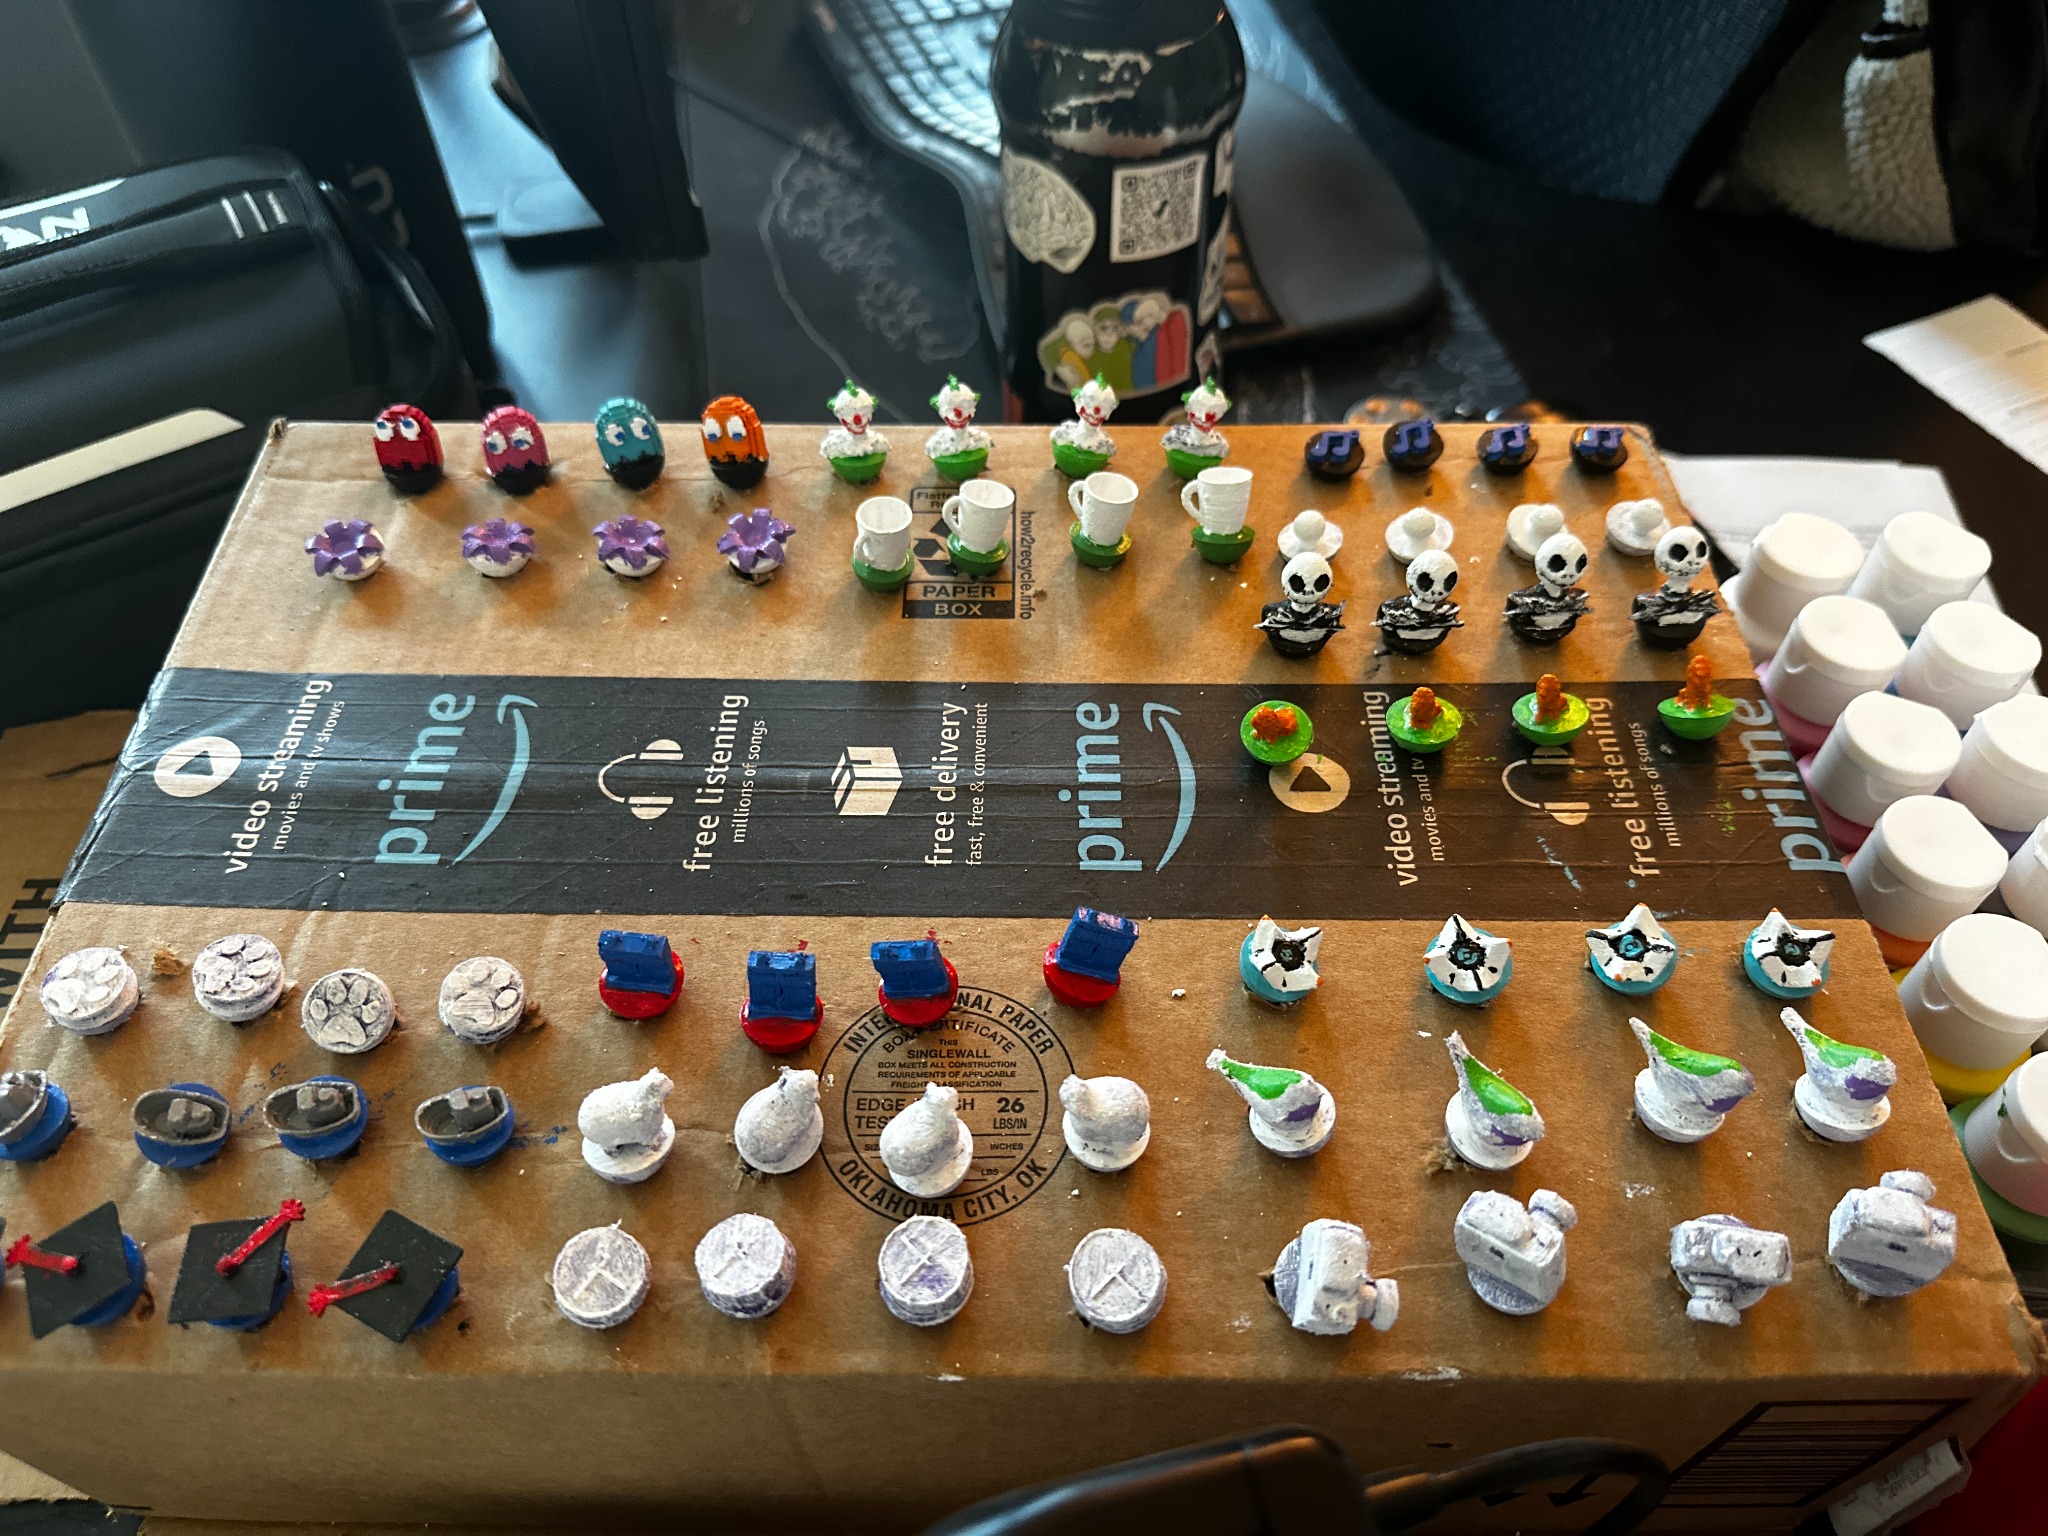
Once the designs were chosen, I shifted into full production mode. All the chosen designs were printed in one base filament color and laid out in neat rows on a cardboard box. Each row corresponds to one four-piece set, and I could see multiples of each character type lined up together.
At this point the pieces still had rough edges and support scars—this was just after printing and removal from the build plate. This was the moment where the project shifted from "idea" to "factory": 72 little purple characters, counted and ready for finishing.
 Full production: 72 pieces straight off the printer, organized by set and ready for cleanup.
Cleanup & Prep
Every miniature had to be trimmed, sanded, and cleaned so it would sit flat on the board without wobbling, fit smoothly into the drilled holes, and take paint evenly without fuzz, strings, or ridges. This was essentially a miniature-scale production line: clip supports, sand, wipe down, then move them back onto the cardboard tray for painting.
This prep work is the invisible labor that makes the final painted pieces look so clean and intentional.
Painting the Full Lineup – 18 Themed Sets
Now the project exploded into color. The same cardboard "factory floor" was covered with fully primed and painted marbles, organized in rows. Each row is a 4-piece themed set: Pac-Man-style ghosts in bright arcade colors, purple flowers, tiny white teacups on green saucers, skeleton characters in black and white, little flames on green bases, graduation caps, rings, spacey shapes, potions, robots, and more.
I standardized the layout so I could double-check counts and ensure nobody's set was missing a piece. The paint job was kept bold and readable so the characters look good even from across the board.
 The complete collection: 18 themed sets, each intentionally chosen and hand-painted.
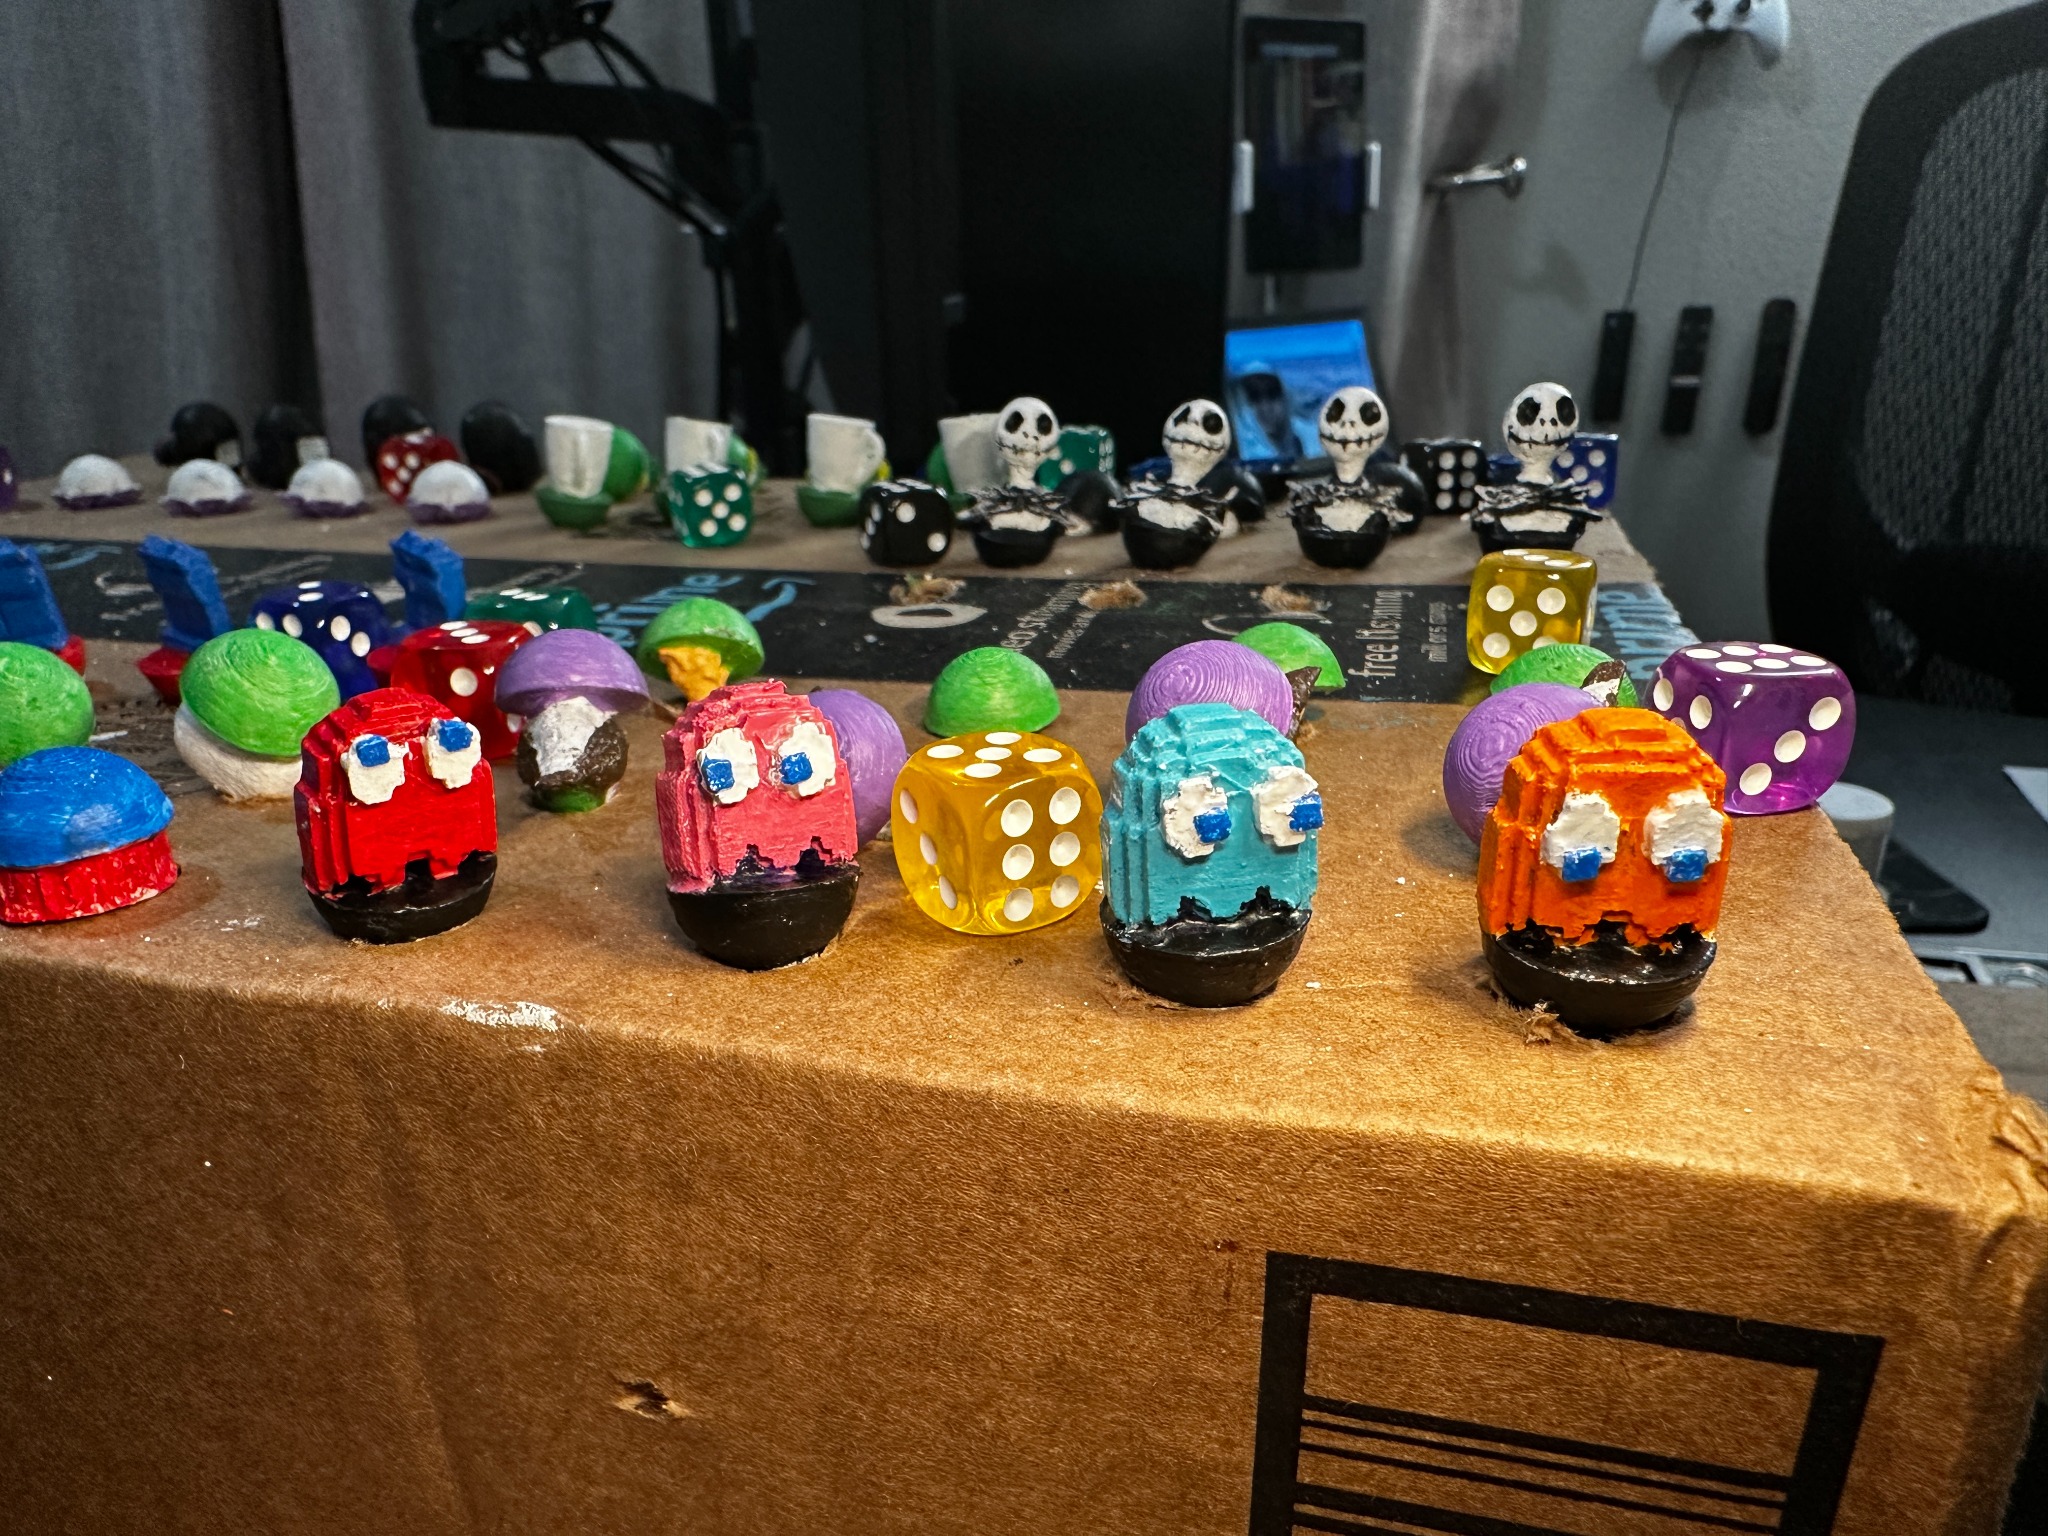 Ghost set detail: hand-painted eyes and mouths give each piece personality.
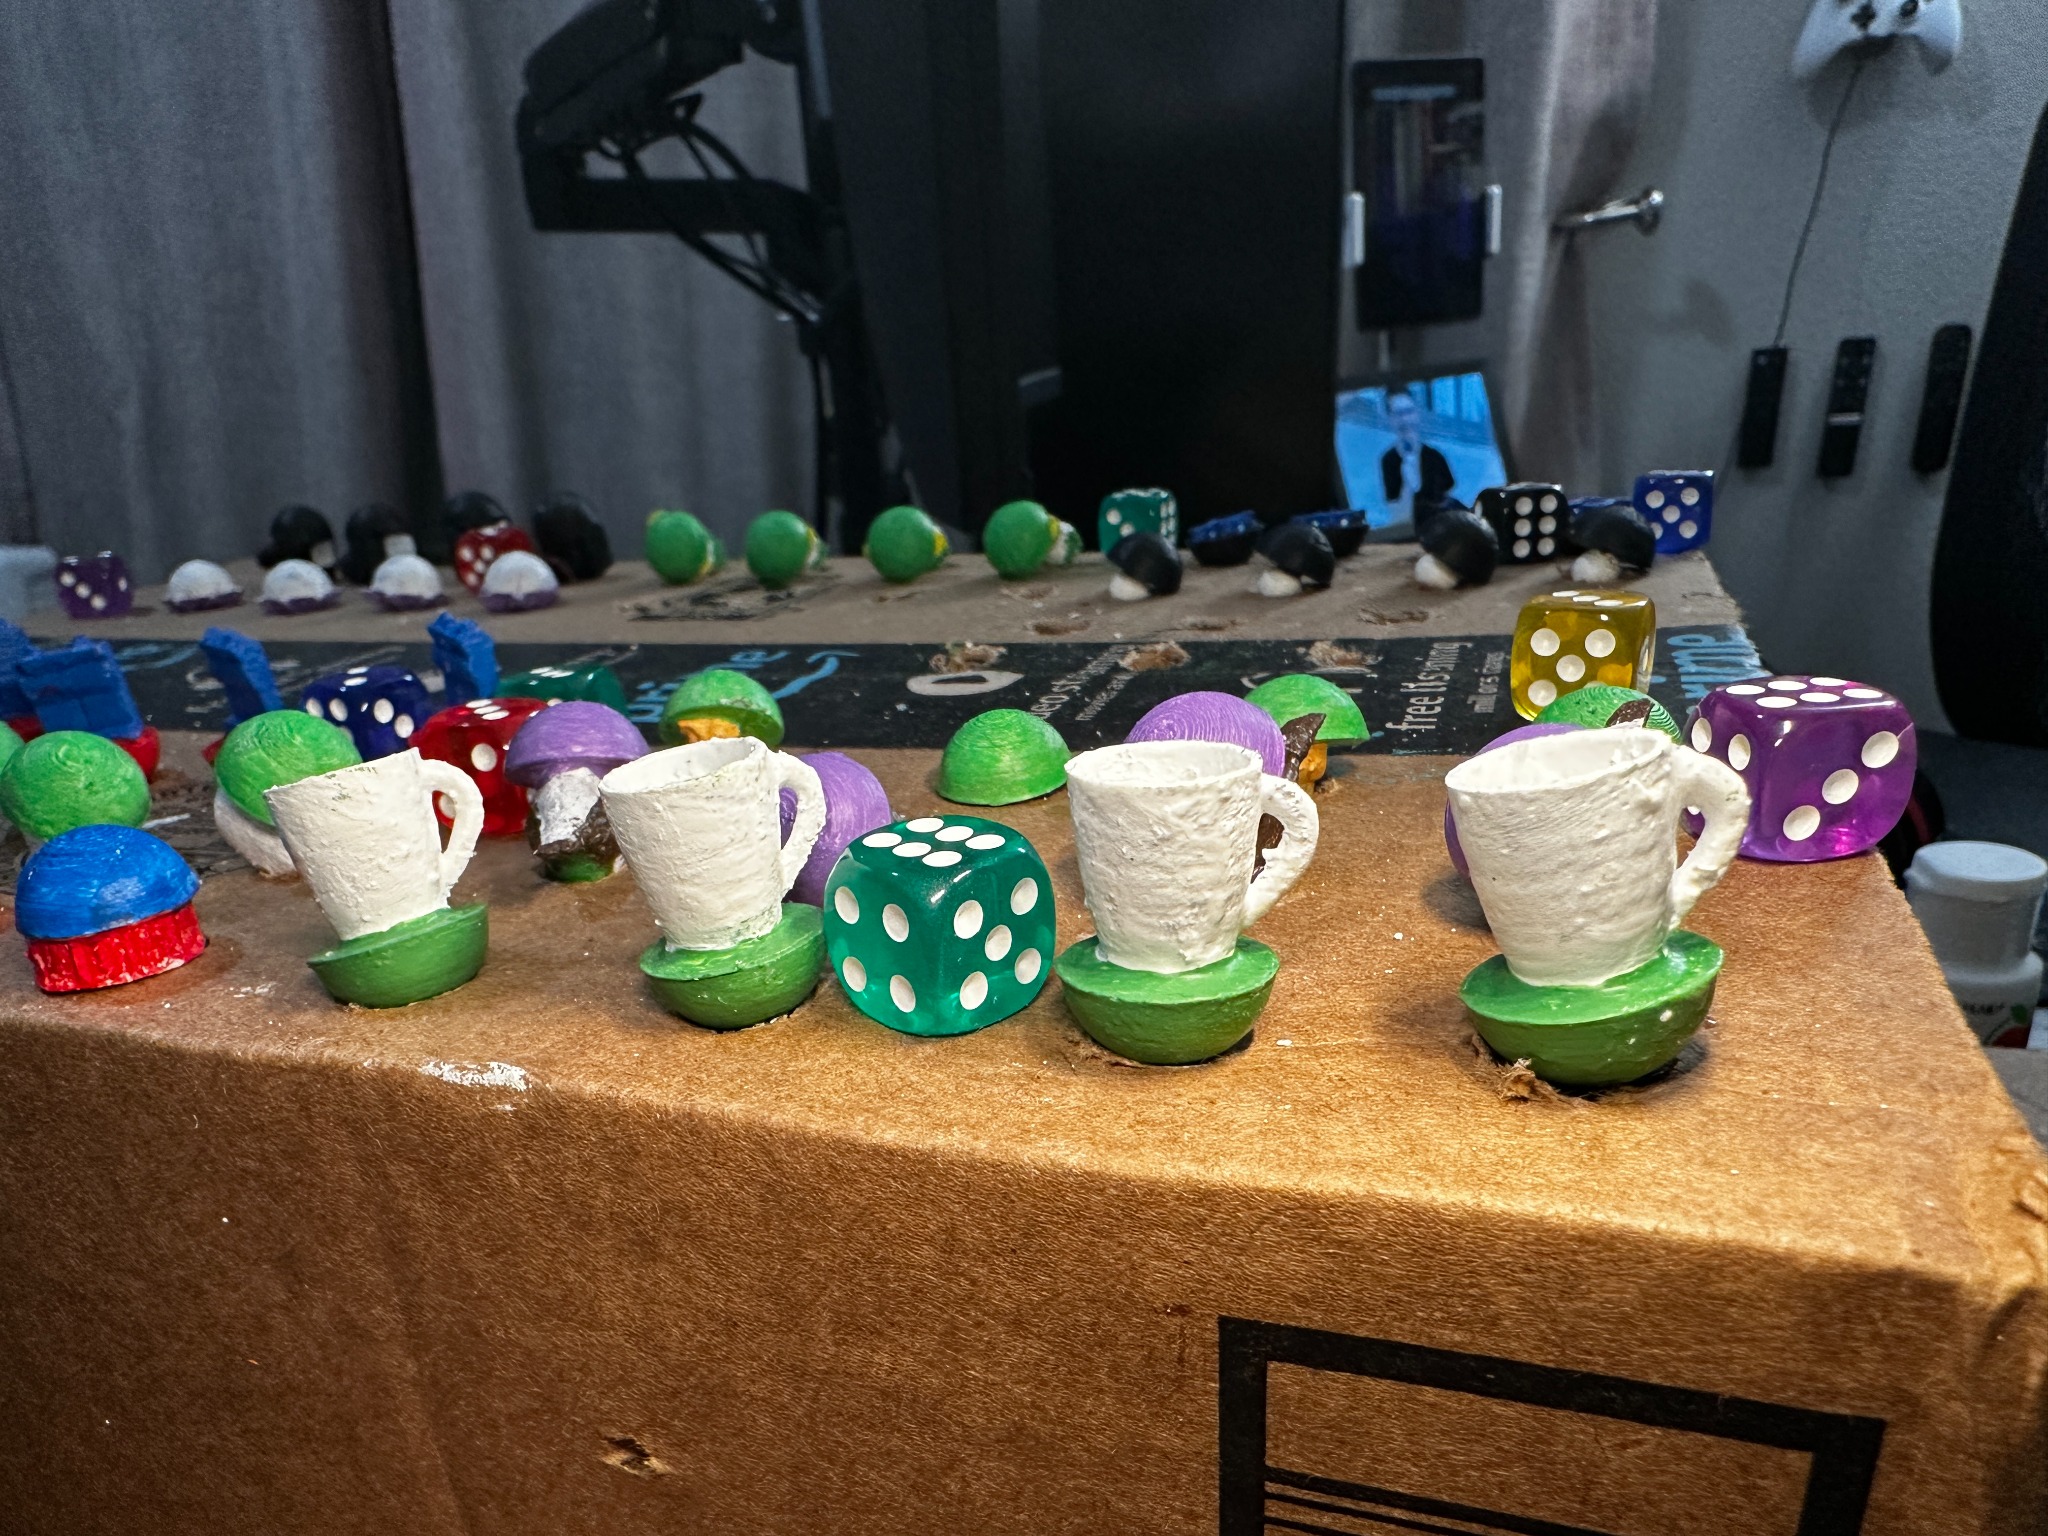 Teacup set: proving that even delicate shapes with handles can survive printing, sanding, and painting.
Packaging Individual Sets as Gifts
To turn these from components into actual Christmas presents, I packaged each set in a metal gift tin lined with black foam. Each family member got their own tin with their specific theme inside, plus a color-coordinated die.
The foam keeps the pieces from rattling around and instantly makes the whole thing feel premium and intentional, not just some loose 3D prints. The tin format means people can carry their set with them, just like a favorite game character or lucky charm.
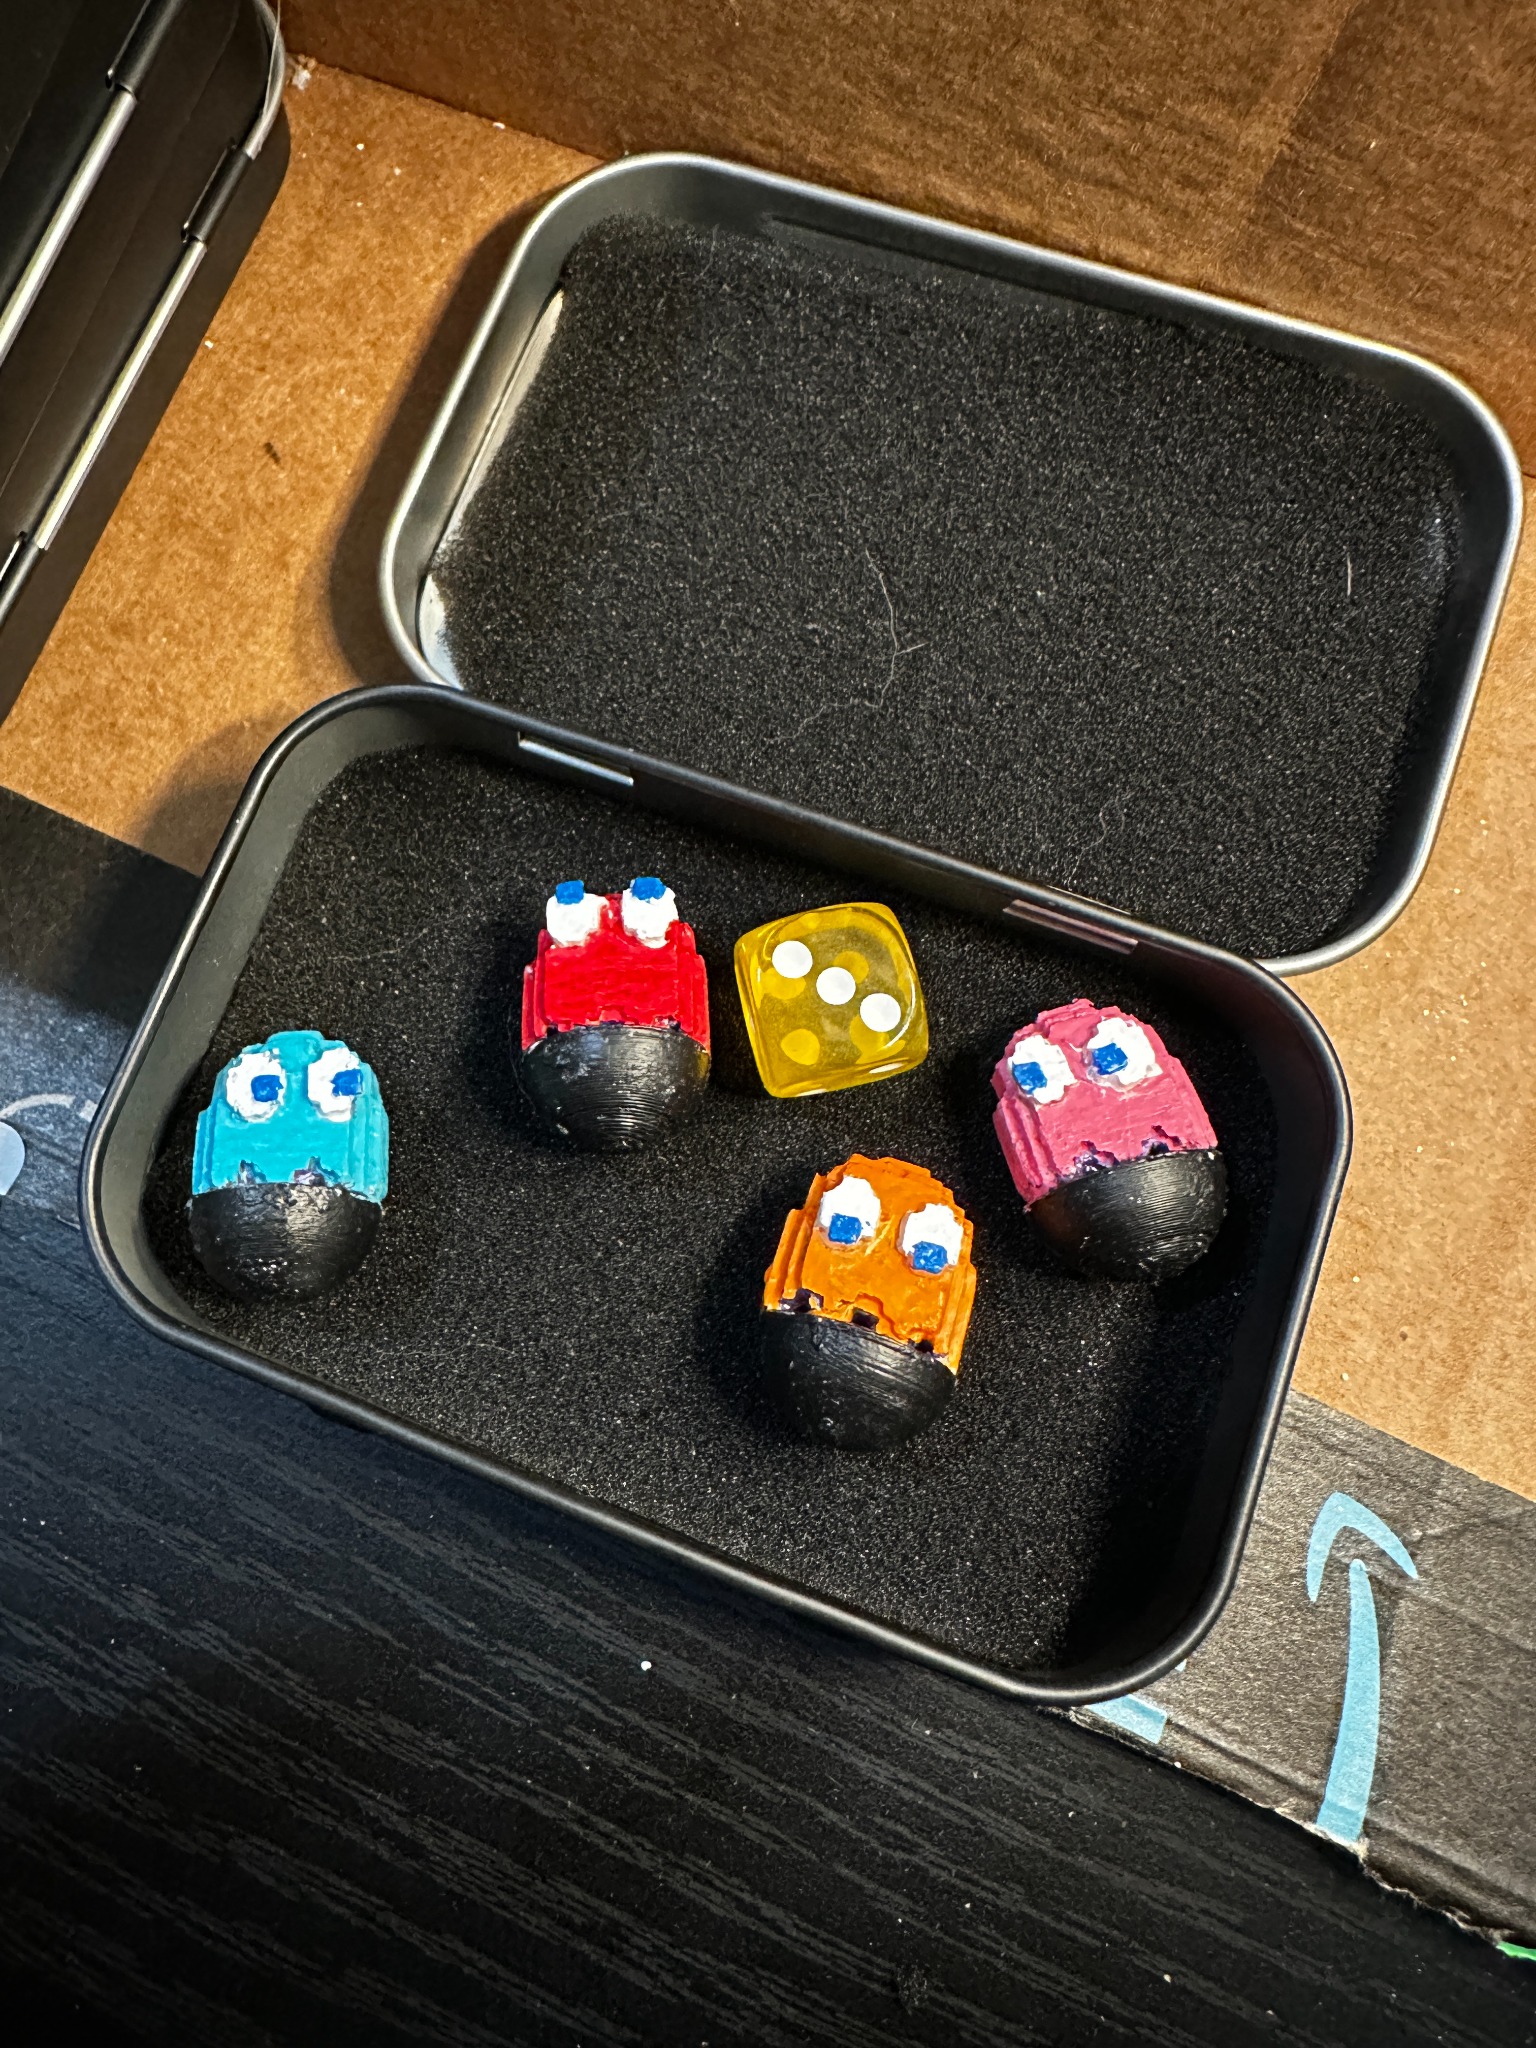 Gift-ready: each set packaged in a foam-lined tin with matching die.
Building the Marble Board
To bring all the sets together, I built a full-size wooden marble board. The board is a large laminated wood square with concentric tracks of evenly spaced holes for the marbles. In the center is a raised wooden dice tray, lined with bright red felt for rolling and for storing pieces between games.
I used a Forstner bit sized to match the 3D-printed marbles so they sit securely without binding. I carefully spaced the holes so the marbles have room to breathe but still read as a continuous path, and tested depth so each marble "nests" slightly below the surface instead of just perching on top.
The wood and felt make the plastic pieces feel grounded and tactile when you move them. The hole spacing is tight enough that the tiny figures feel "snapped in" but still easy to lift.
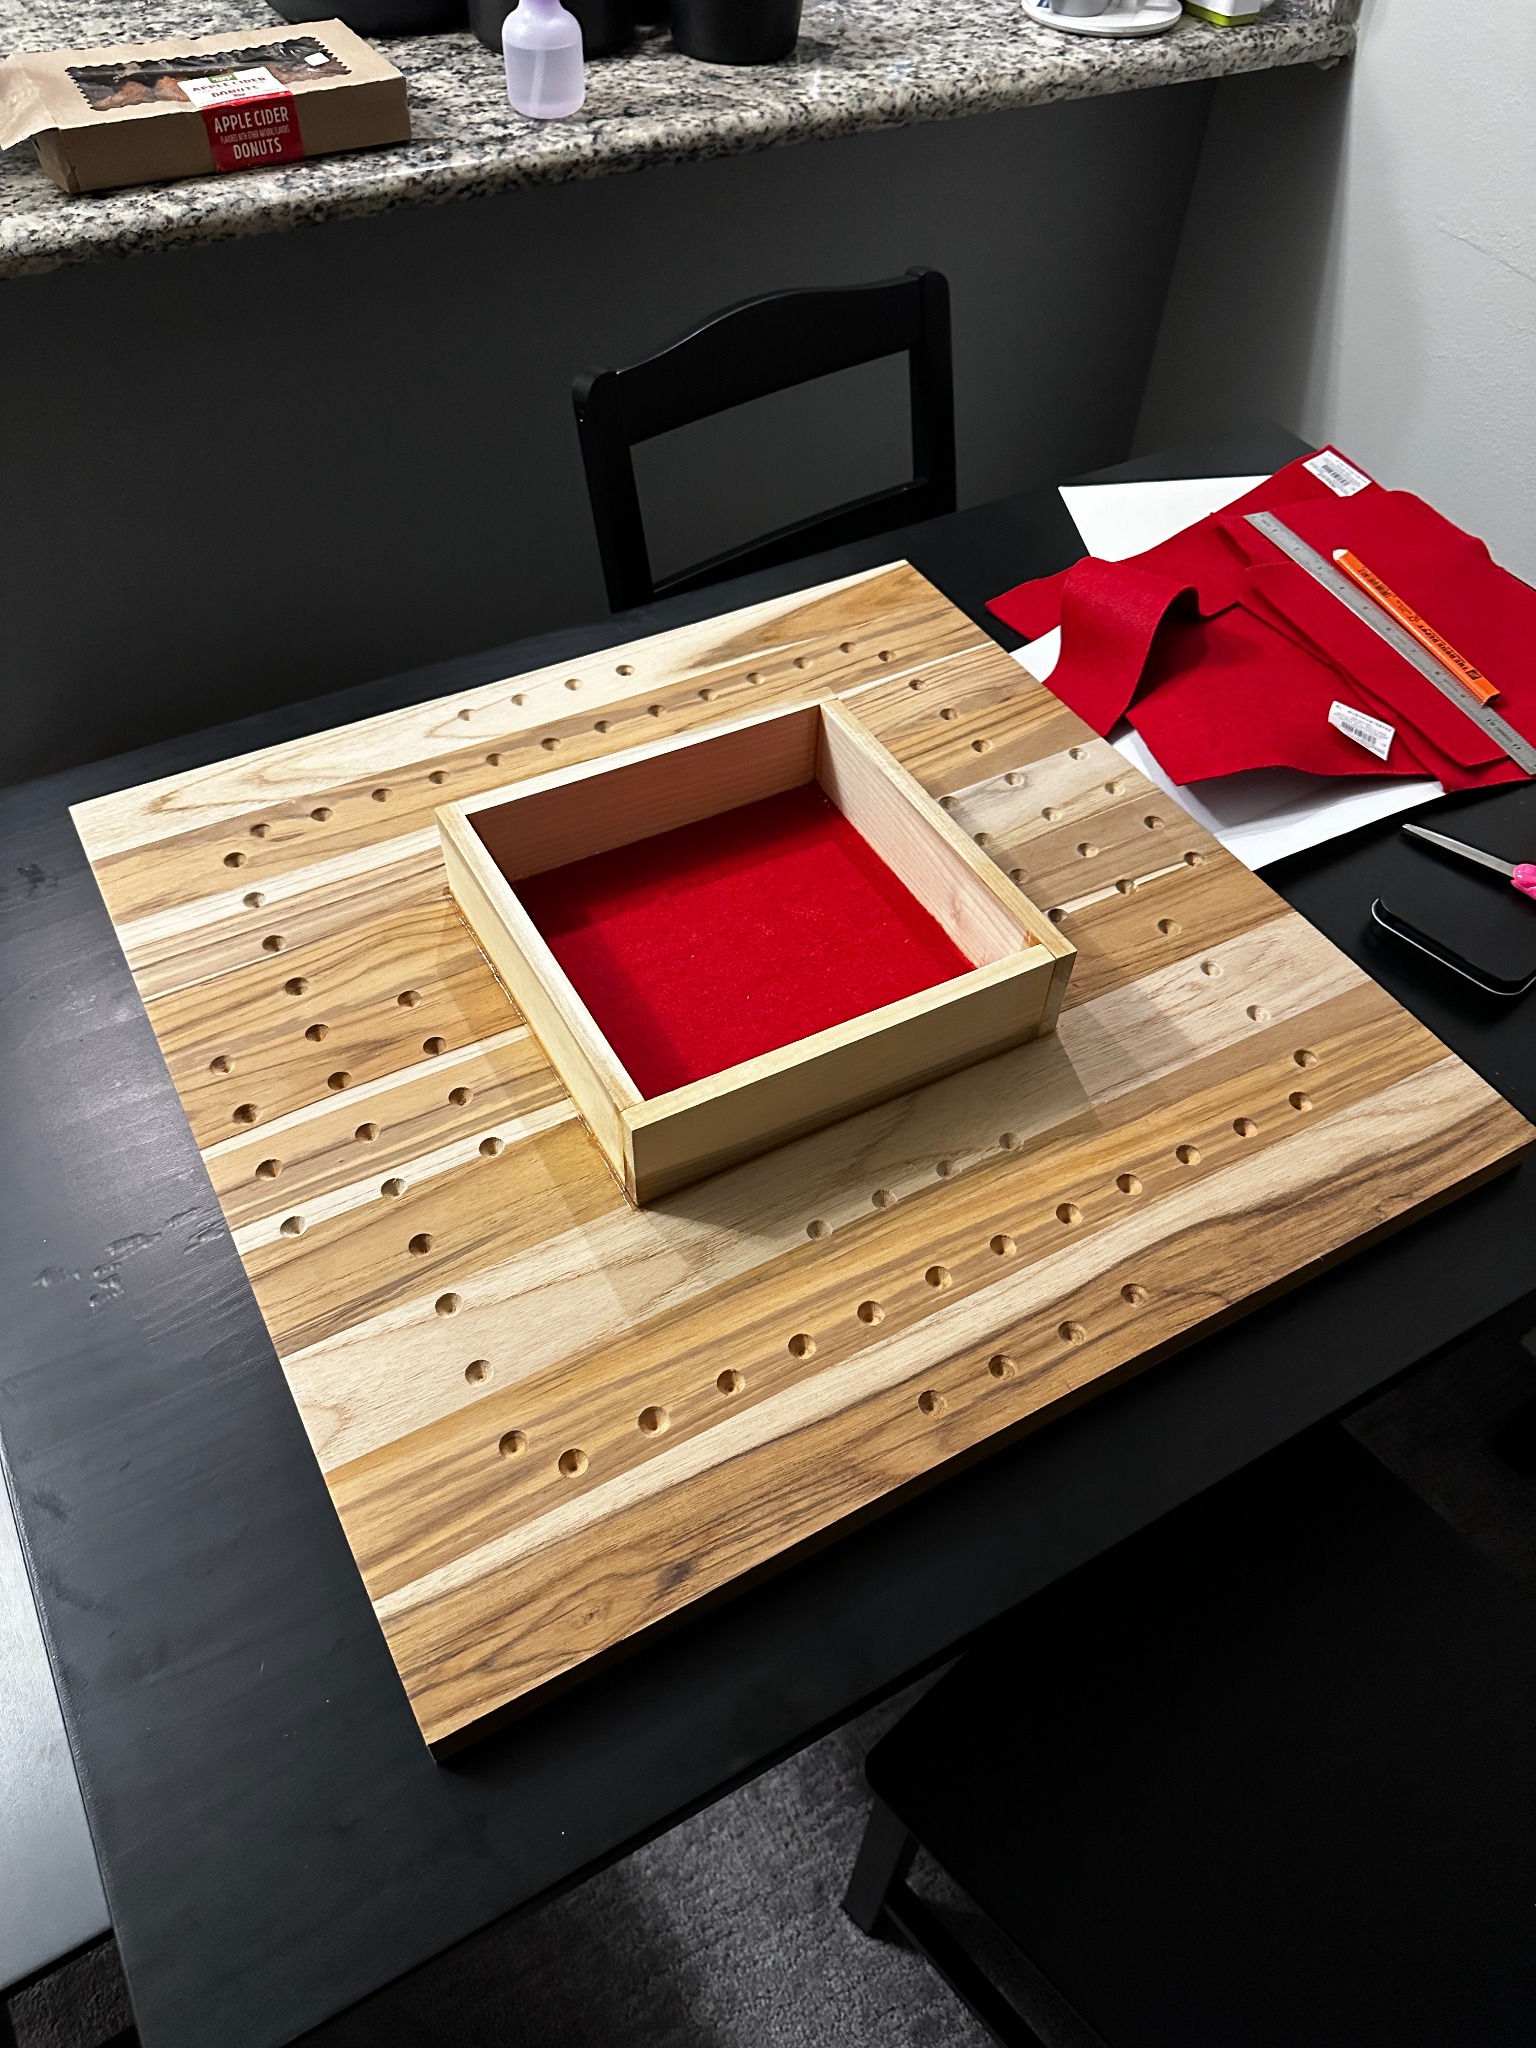 The communal game surface: laminated wood with felt-lined center tray to tie all the custom sets together.
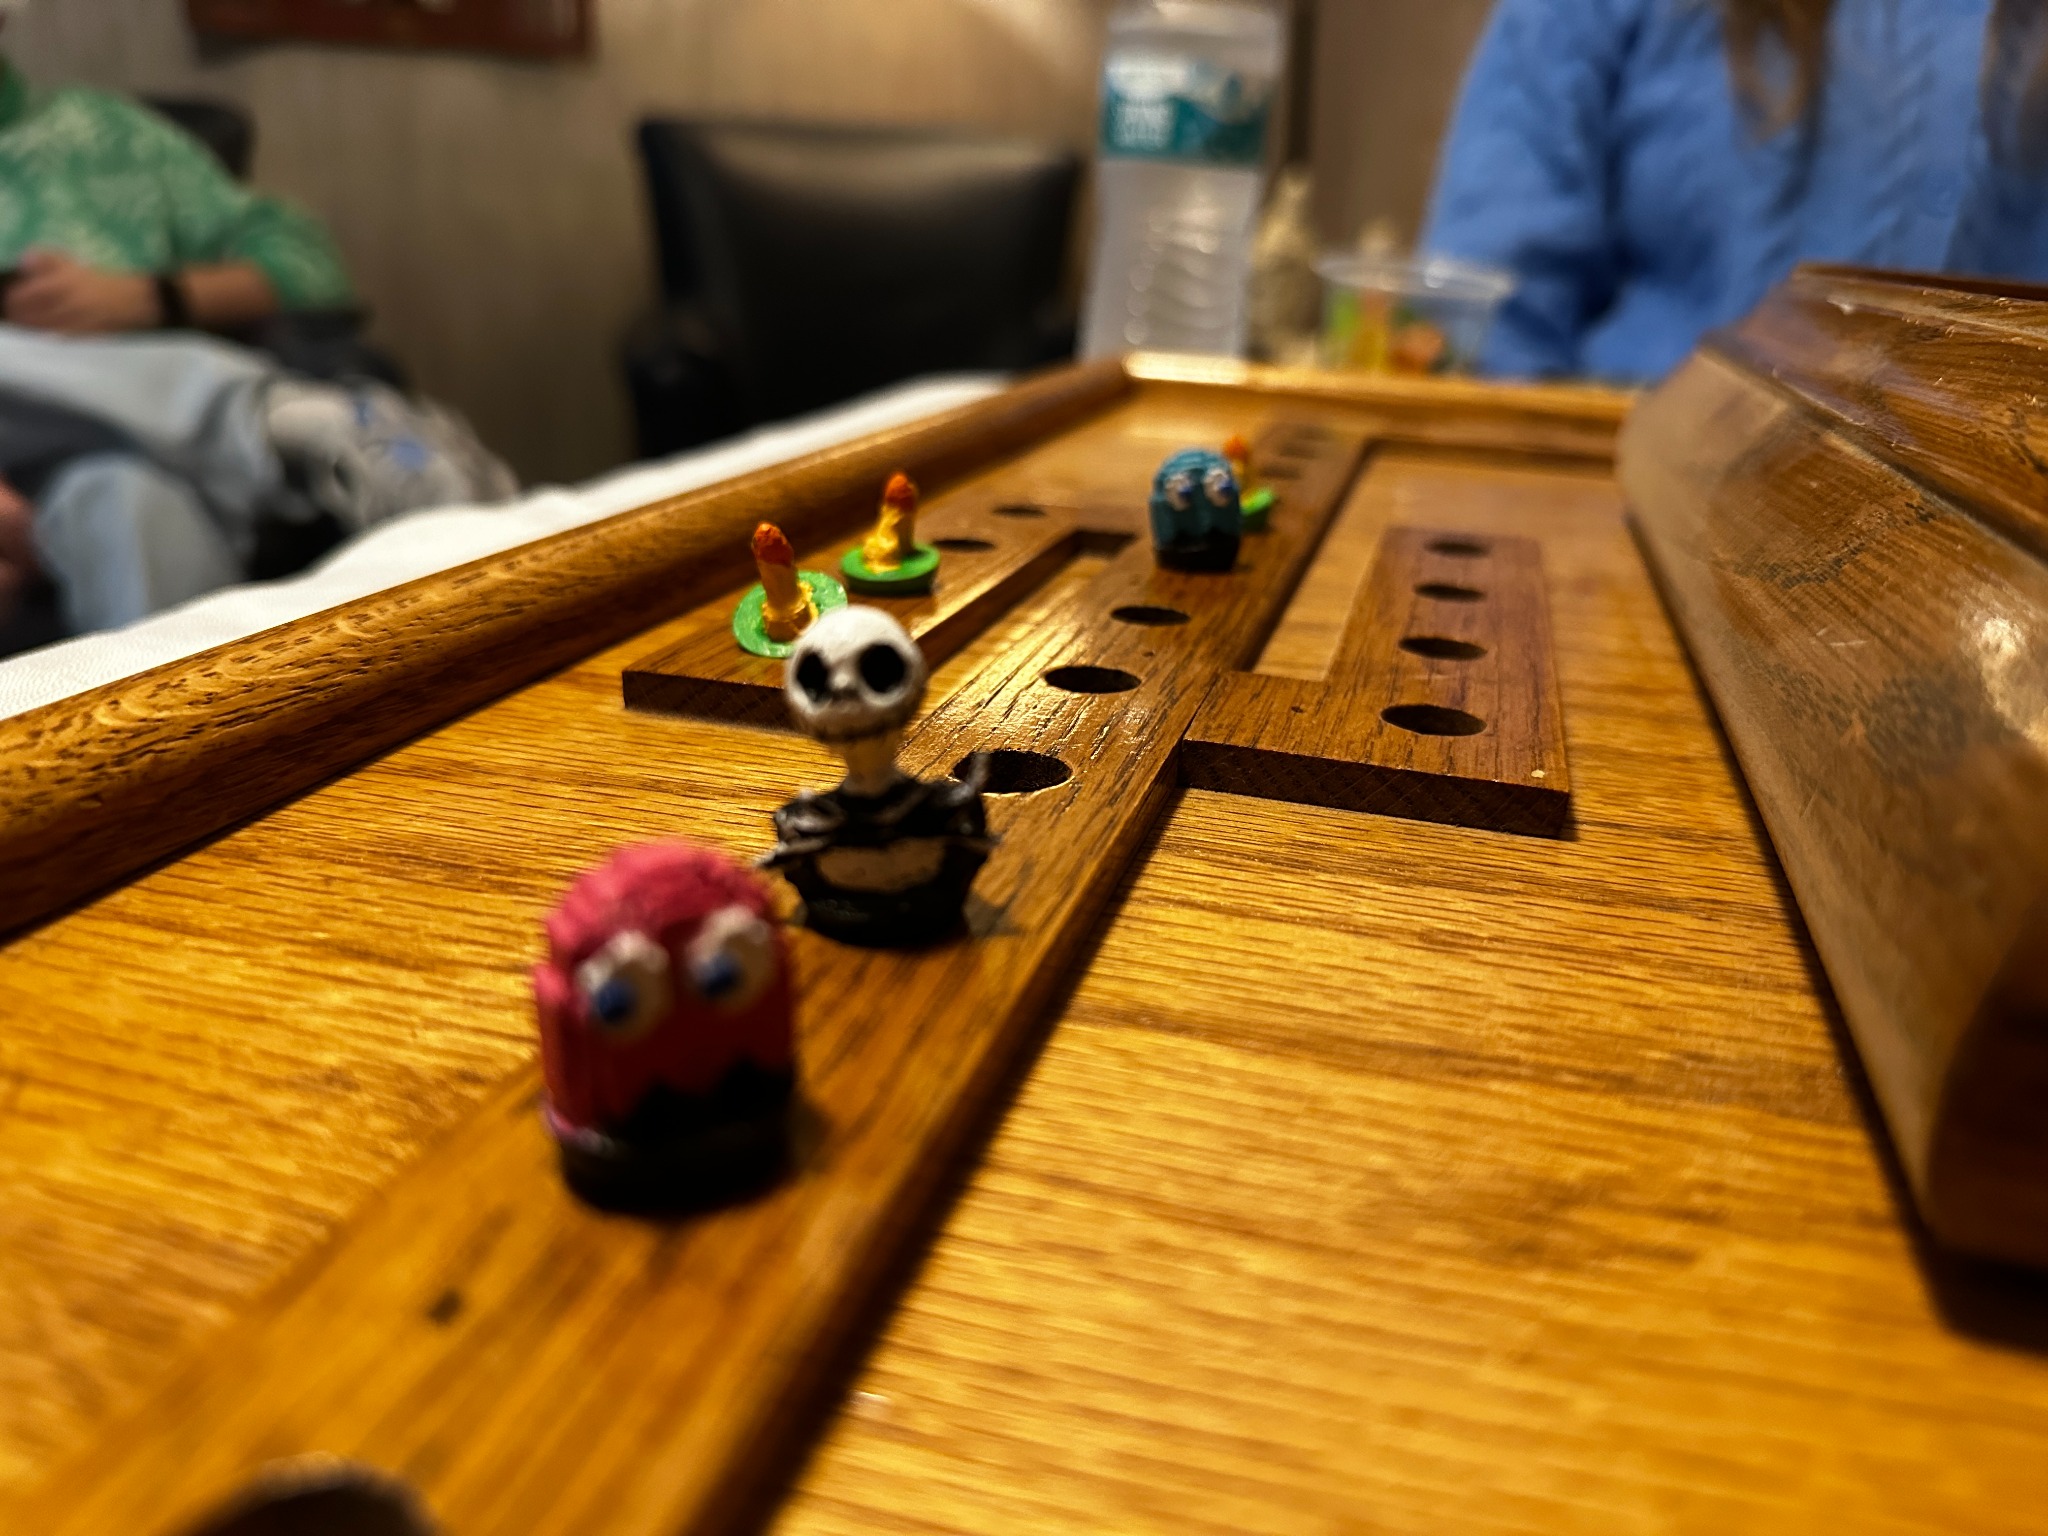
First Game: Custom Marbles in Action
Finally, the payoff on Christmas. The finished wooden board was set up, and the painted marbles were actually in play. Different character sets were on the track—ghosts, skeletons, flame pieces—with family gathered around, snacks and drinks nearby.
This moment represents proof that the pieces are functional game tokens, not just decorative minis. It's the satisfaction of seeing a full workflow—design, 3D print, post-process, paint, package, board build—come together in a real family game night. A set of objects that are both personal gifts and part of a shared tradition.
Impact
By the numbers:
- 72 custom game pieces designed, printed, and painted
- 18 unique themed sets, one for each family member
- One handmade wooden board with felt-lined dice tray
- Successful Christmas Day debut with full family participation
What changed:
- Transformed a generic board game into a personalized family tradition
- Created a gift that's both individual (custom marble sets) and collective (shared board)
- Proved that personal manufacturing at home can produce gift-quality results
- Established a repeatable workflow for small-batch custom game piece production
Challenges & Solutions
Scale and printability: At marble size, many designs that look good on screen turn into unprintable blobs. I solved this by running a wide design exploration phase, printing many candidates at once to see what actually works at this scale.
Paint coverage on curves: Getting solid paint coverage on tiny curved surfaces is difficult. I addressed this with proper priming, multiple thin coats, and careful brush control. The bolder color choices also helped—subtle gradients wouldn't have read at this scale.
Board hole precision: The drilled holes needed to be perfectly sized and evenly spaced. Too small and the marbles bind; too large and they fall through. I tested multiple bit sizes and ran sample marbles through test holes before committing to drilling the full board.
Production timeline: 72 pieces is a lot to finish in time for Christmas. I broke the work into parallel streams: while one batch dried from priming, I'd sand the next batch. While paint cured, I'd work on the board. This assembly-line approach kept the project moving without bottlenecks.
What I Learned
I learned that small-scale production projects require ruthless process discipline. When you're making dozens of identical operations, even tiny inefficiencies multiply. Setting up a proper workspace with staging areas for each step (raw prints, sanded pieces, primed pieces, painted pieces) made a huge difference.
I also learned how to paint at miniature scale: thin coats, steady hands, and accepting that perfect is the enemy of done. At this size, what matters is bold shapes and clean contrast, not fine detail work.
Most importantly, I learned that the best gifts combine personal thoughtfulness with shared experience. Everyone got their own unique set, but the real magic happened when we all brought our marbles to the board together.
Future improvements:
- Design modular board sections that can expand for larger player counts
- Create a painted finish or seal for the wood board to protect it long-term
- Develop a "create your own set" template for future family members
- Experiment with resin printing for even finer detail on future miniature projects
Links
- Files: Private (custom 3D models and paint references)
- Related: Future miniature painting and board game projects